Showing posts with label My Besties. Show all posts

Thursday, January 7, 2016

IT'S A NEW YEAR FOR THE BESTIES


It's always fun when Sherrie Baldy has a My Besties release and I get to create

Shop this image here


This is the first of many projects that I plan to bring to my site Glittered Roses

Thank you for stopping by

Happy New Year, xoxo


Saturday, December 5, 2015

MY BESTIES NEW RELEASE

                 
New, New, New Besties in the shop
click the link to shop for this image


click the link to download this printable...it's always fun to see my work turned into a downloadable print

xoxo


MY BESTIES NEW RELEASE


I have taken a liking to coloring in Black and White on Kraft paper.  This is a new Christmas release for the My Besties collection that can be found in the shop by clicking the link
                                    
I love this sentiment for this image, it is a retired stamp by Amuse...Some stamps you just have to hold onto 
             
I thank you for stopping by my blog and truly hope that I inspire you in one way or the other into
"creating something handmade"

xox


Saturday, November 21, 2015

PARIS...A MY BESTIES FREEBIE

Even with things around the World are in a state of confusion, it is nice to know that we can come together and show unity by way of art.  Sherri Baldy, owner and creator of the My Besties Dolls has created this image for a free to download, click here 
I printed the image on Kraft Cardstock from my HP printer, then I used Prisma Pencils to color in Grey and White
Thank you for stopping by my blog and click the link to download your image

xoxo


Tuesday, November 17, 2015

MY BESTIES AND COPIC COLORING

My Besties has a new release and this handsome guy is one of them
"Say A Little Prayer"

I hand colored this image with Copic markers and did a little experimenting with Photo Shop to make the background more white and brighten the image up a bit

The face combination.  I love to use BV000 for accenting the shadows on my images
 
Drew in some stripes on his shirt

The shoe combination


Thank you so much for stopping by my blog

xoxo 

Thursday, August 27, 2015

MY BESTIES: NEW RELEASES


New release day over at the My Besties shop is always a hit...here is one of the ever so spooky images that you can find in the shop


I colored this image with Copic and used some Vintage Photo Distress Ink for highlights and deep shadows.  I think I will forever be addicted to glitter, but when I design with this sparkly goodness I don't want it to get all over the place so I always use my Xyron tool .  I run the shape through the machine and rub the glitter into the sticky and boom, no mess...

thanks for stopping by the blog

Deirdre xoxo


Monday, May 18, 2015

DEEP SHADOWS AROUND THE IMAGE

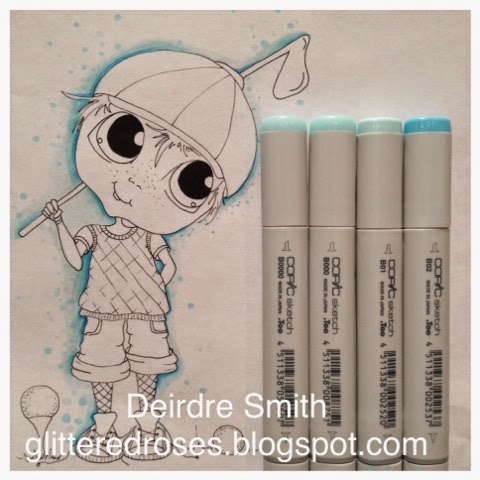
Coloring with for me is about the little details, the little things that make and image pop and come alive.  Today I wanted to share a quick tutorial for creating shadows using my Copic Markers.  This image can be purchased in Sherri Baldy's Etsy shop, click here


B02
I wanted to have the shadows appear to be in the very back of this image so I started with my darkest color and outlined in random areas that would bring the image forward


B01

Going over the first color and out, I wanted to blend and soften the first color, coming in with random dots using the tip of the marker


B000; B0000

Using these 2 color back to back these are the lightest colors again going over lightly the previous colors I just extended the shadow out  and adding more random dots


B02; B01, B000; B0000

Using all 4 colors I added and did my touch ups, and even without adding the color to the actual image upi can see how the shading gives the appearance of the image coming off the page.

Thank you so much for stopping by the blog today and if you would like to purchase this image click here to go directly to the shop

xoxo Deirdre


Saturday, March 21, 2015

MIXED MEDIA MINI ALBUM WITH A TOUCH OF STEAMPUNK


Sometime when I create I don't always know how things will turn out until I am all done.  I try and express my creativity through my projects because in my mind arts and crafts are the best thing in the world.  I have been given a wonderful opportunity to create for Sherri Baldy, owner of My Besties digital and rubber stamps.  You can find a new post every Monday so please make sure you stop by and say hello.

For my project I decorated  a 6x6 mini album cover.  This adorable Steampunk image can be purchase by clicking the link here 


The thought I had when I started was to create on a book page.  I had saw projects online and on Pinterest where projects were being water colored on book paper...so now that my wheels started spinning, I really  wanted to color with my Copic markers because I have a bigger range of colors...but
 how does one do that?  If I print my digital image on this page, the inks are going ruin my markers and make a muddy mess.


What was the secret?  Gesso.  I coated the book paper with a thin layer of Gesso  (a thick white primer that seals, stiffens, and provides surface "tooth" for painting surfaces.  For use with Acrylic, Oils, Casein, Tempera and other paint media) and fast dried it with my heat gun.

Now while the directions said nothing about Alcohol ink I thought in my mind let me try, let me see what will happen if I color on top of this sealer what will happen.

(in this photo you are looking at the extra details I did which I will explain below)


I printed the image from my HP Deskjet 1510 and heat set it with my heat gun, I just wanted to make sure that when I started to color that the ink would not react and mess up the nibs of my markers.  When I started to color I loved that I was still able to have the wording peek through the color.  One thing that I loved when I started to add the color is how the ink stayed on the surface and moved, giving it the feeling of water color.  So don't be alarmed if the color stays wet a bit longer, just let it dry before adding more color or it may become a bit tacky, but rest assured that your markers are not harmed


The extra details are what I love just the same.  I brought out my washi tape, yet I did not want the tape to be such a strong focus point on my project, so I took my finger and dipped it into Gesso and rubbed it over the tape to mute it a bit.  Then got the Modeling Paste and my stencil create another layer of texture.  Mixed Media and layer are my one opportunity to be free and not worry about alignment and perfection...lol, I have issue with things not lining up, but not here...


I rate this project a 10 because I love that you can start with one technique and build to create a fun piece of art.  Creativity is all about trying new things out and seeing what becomes in the end.

I appreciate you stopping by my blog and viewing my project..check out the blog every Monday for a new My Besties Project

xoxo, Deirdre


This is the brand of Gesso I have used and what the page looks like before primed and printed on


To add extra depth in my coloring I dry brush on Walnut Stain Ink from Tim Holtz


Thank you for stopping by....


Tuesday, March 10, 2015

YOU ARE MY HAPPY


Welcome to my design team post for Sherrie Baldy Art.  Have you ever just felt that you should just celebrate to just be celebrating?  Well that is me, when I sit down to create I just go with what is on my heart, and for the month so far I've been in celebration mode.  You can find her in Sherri Blady's Etsy shop


I am always practicing coloring, learning myself new color combinations, especially for skin and hair, I like to use chalk on the face to give a softer, more natural look


Now with the hair....well this started out in my mind to be blond with pink streaks.  I will have to go back to the drawing board on this one, I like the depth, but would like to learn to highlight when using non-traditional colors.


I really like to make embellishments, so where the balloons were I added a shaker 


I assembled the shaker and covered it with silver glitter paper to add that extra glitter


I used paper and stickers from Echo Park, For The Record 2


I am really happy with how this project turned out....

xoxo, Deirdre


Tuesday, March 3, 2015

IT'S TIME TO CELEBRATE AND HAVE FUN


The best part about Sherri Baldy and My Besties, is that there's something new and exciting always happening.  
Today's post comes with a ton of excitement and and abundance of love because I have been asked to be apart of Sherri's personal blog team as a contributor and team coordinator...Oh my can you hear my excitement?
Every Monday I will be posting something new and wonderful showcasing her beautiful hand drawn art


To get the show started I have used this image which can be purchased at the ETSY Shop byclicking here
She is a cutie that I have paper pieced her dress using Simple Stories Summer Fresh paper line 


This digital image was printed at 3x4 allowing me to make a 6x6 card 


My favorite part of this image was coloring her hair.  I have used the above listed Copic Markers and when it came time to do the ponytails I use the tip to paper technique creating clusters of dots.  I did a few extra just to make her pony tails stand out even more


The above colors listed are Copic Markers.  I used a chalk to color her cute cheeks


I cannot tell you how happy I am with how she turned out.  I really love how vibrant and alive the image becomes when Copic Markers are used.

March is the kick off for the blog, it's National Craft Month and Sherri has announced that her sponsor program is up and taking request.  If you are interested in having My Besties sponsor you blog challenges send your email request to:  ShersL84bed@aolcom

I look forward to sharing my projects with you each and every Monday, until then happy crafting

xoxo


Related Posts Plugin for WordPress, Blogger...