Showing posts with label Copic Markers. Show all posts

Monday, May 11, 2015

EASY SHADING FOR CLOTHING


It's a good day to be a Besties fan, today is Monday and I have an easy project tutorial that you can use when it comes to shading clothing.  For my project I have used this Big Eyed Big Head Doll img581 which can be purchased from the shop by clicking here


There are so many directions you can go when it comes to card making and using the Besties.  I incorporated an embossing folder to add texture to the card front and used a folder that went along with the head band


When I was looking for the perfect sentiment to go with this card I went to my stash and found this retired stamp from A Muse Art stamps, I do have to say the look on this dolls face and the way she is holding the heart just reminded me of a big box of chocolate


For this image I wanted to give some shadows so that the skirt would not be so flat.  Using my Copic Markers C00, C3, C5 I started with and colored the entire skirt with C00.  Next I decided where I wanted the deepest shadow, which in this case was on the fold of each layer (or the lines in the skirt) .  Following the line pattern lengthwise, I laid down my deepest color C5 and made a thick line.  Using C3 I repeated the previous step only overlapping the edge of C5 in order to blend and soften the color just a bit.  If you work fairly quick the ink will still be wet and you won't have to work so hard at blending.  Wanting to add more depth in spots I took my C5 and flicked in more color at the waist and at the bow and when I was happy I went of over the whole skirt lightly with C00 to blend all colors. 

For me this is a quick and easy way to add depth when the skirt itself has shape but no print


I hope that you find this Monday tip for coloring your Besties helpful and if you want to purchase this image, click here and you will be taken directly to the shop

Thank you so much for stopping by my blog

xoxo

Deirdre 


Friday, May 8, 2015

DID A LITTLE COLORING TODAY


I colored this image from Pink Bow Ties Owner Lameka Alston.  I kinds of really like this image.  I was not sure the direction I was going when I went to pick paper...lol, normally I pick paper then I color, but I just knew it would all come together and together it did!!!


I used a random cluster of flowers and twine


this card measures 6x6


Thank you for stopping by the blog

xoxo


Tuesday, May 5, 2015

TEACHING COPICS IN OHIO

A few of the Ladies from my Copic Class in Ohio
I was a little nervous to travel from Vegas to Ohio to teach my Copic Class, but when I got there everything fell into place.  I can honestly say that no matter the size of the group, I adore teaching...

While you can not fully see her face here, this is Teri, when I say I love her, I really mean that from the bottom of my heart.  She had the biggest heart that I could have ever known to women.  So very kind and just a true genuine special young lady.  Teri was sick and passed away shortly after returning home after the crop.  I am truly happy to have had the chance to meet her in person and call her my friend...RIP in Teri


This is Teri who is looking towards the camera, she was just the sweetest person....

I had an amazing time and so thankful to all the Ladies who attended my workshop.....

xoxo

Saturday, March 21, 2015

MIXED MEDIA MINI ALBUM WITH A TOUCH OF STEAMPUNK


Sometime when I create I don't always know how things will turn out until I am all done.  I try and express my creativity through my projects because in my mind arts and crafts are the best thing in the world.  I have been given a wonderful opportunity to create for Sherri Baldy, owner of My Besties digital and rubber stamps.  You can find a new post every Monday so please make sure you stop by and say hello.

For my project I decorated  a 6x6 mini album cover.  This adorable Steampunk image can be purchase by clicking the link here 


The thought I had when I started was to create on a book page.  I had saw projects online and on Pinterest where projects were being water colored on book paper...so now that my wheels started spinning, I really  wanted to color with my Copic markers because I have a bigger range of colors...but
 how does one do that?  If I print my digital image on this page, the inks are going ruin my markers and make a muddy mess.


What was the secret?  Gesso.  I coated the book paper with a thin layer of Gesso  (a thick white primer that seals, stiffens, and provides surface "tooth" for painting surfaces.  For use with Acrylic, Oils, Casein, Tempera and other paint media) and fast dried it with my heat gun.

Now while the directions said nothing about Alcohol ink I thought in my mind let me try, let me see what will happen if I color on top of this sealer what will happen.

(in this photo you are looking at the extra details I did which I will explain below)


I printed the image from my HP Deskjet 1510 and heat set it with my heat gun, I just wanted to make sure that when I started to color that the ink would not react and mess up the nibs of my markers.  When I started to color I loved that I was still able to have the wording peek through the color.  One thing that I loved when I started to add the color is how the ink stayed on the surface and moved, giving it the feeling of water color.  So don't be alarmed if the color stays wet a bit longer, just let it dry before adding more color or it may become a bit tacky, but rest assured that your markers are not harmed


The extra details are what I love just the same.  I brought out my washi tape, yet I did not want the tape to be such a strong focus point on my project, so I took my finger and dipped it into Gesso and rubbed it over the tape to mute it a bit.  Then got the Modeling Paste and my stencil create another layer of texture.  Mixed Media and layer are my one opportunity to be free and not worry about alignment and perfection...lol, I have issue with things not lining up, but not here...


I rate this project a 10 because I love that you can start with one technique and build to create a fun piece of art.  Creativity is all about trying new things out and seeing what becomes in the end.

I appreciate you stopping by my blog and viewing my project..check out the blog every Monday for a new My Besties Project

xoxo, Deirdre


This is the brand of Gesso I have used and what the page looks like before primed and printed on


To add extra depth in my coloring I dry brush on Walnut Stain Ink from Tim Holtz


Thank you for stopping by....


Wednesday, December 31, 2014

MY TOP 12 PROJECTS FOR 2014

2014 has been a great year for crafting, I have truly had an awesome year.  It has been a year where I have pushed a few buttons on my creativity level, trying new things and adding some new products to my craft studio.  With a never ending hobby with so many avenues I am looking forward to what the new year will bring.  
Here are my top 12 for 2014:  


Happy New Year Everyone
Let's get busy "creating something handmade" in 2015


xoxo

Thursday, December 11, 2014

GROWING IN UNITY DAY #4


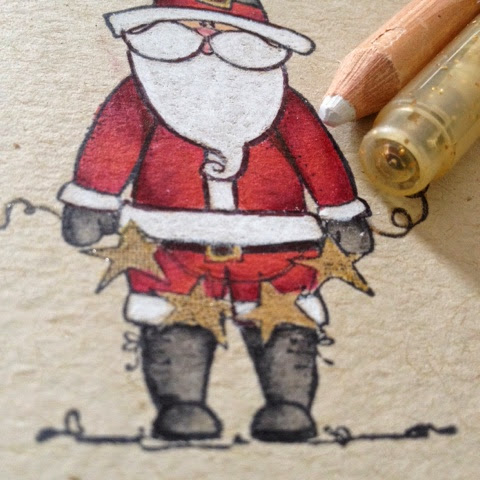
Welcome to my day 4 blog post for Growing In Unity.  Today is a super fun day and a long post, I actually took some step by step photos that I wanted to share with so that you can do some coloring with your Copic markers if you so choose.  Lil' Nick Is one of my holiday stamps, I just adore Angie Blom's designs.


There could not be a Santa without snow, so I pulled out some modeling paste and a stencil and made it snow


I am a layering type of girls, so this was a fun card to create


Star brads and ribbon added that extra touch


Thank you, thank you all so very much.  Today marks the 4th day leaving one more project to complete my week and what a week it has been.  Please take a moment to leave a comment, I will announce one lucky winner who will get to choose 2 of their favorite Unity Itty Bitty (which there are not so itty) stamps, 
how awesome is that!!!

xoxo
A little something extra:


Coloring with Copic Red's are fun, but how about coloring on Kraft cardstock


Copic Grey's are the new Black...


To color the white and add the gold I used a Prisma pencil and Gold Spica pen from Copic


I used Simon Says Stamp Falling Snow Stencil along with modeling paste to create the perfect snowy scene


and this is how it all comes together...xoxo


Monday, September 29, 2014

HOLIDAY CHEER with CAMPER CRAZY OCCASIONS


It's beginning to look alot like Christmas...lol or at least in all the stores I walk into.  I honestly feel like retailers are putting holidays out on the shelves alot earlier, but then again that is a good thing allowing crafter's to get an early start.  For this card I was happy to use Camper Crazy Occasions (C1578) and my Cricut Cartridge Artbooking to create this shadow box style card.


My Reflections Seaside (X7192B) and Yueletide Carols (X7187B) were my choice of designer papers.  The trees were cut at two sizes 6 and 8 from scrap paper and I random cut two half circles from white scrap paper running it through my Xyron to make them sticky to pour Martha Stewart Carrara Marble glitter on top to create a snow drift.  I used Copic Markers to color.


There is nothing like holiday, silky ribbon to finish off any card.  You can really see the sparkle in the glitter, it is for sure my new favorite for snow.  It is stark white with the shimmer like snow....

I want to thank you for stopping by Glittered Roses 
hoping that you are inspired and will be "creating something handmade" for the holidays.  
If you would like to purchase this stamp set and any of  the designer papers be sure and click the link to 

xoxo


Tuesday, September 16, 2014

Copic Class Display Using My Besties


Coloring will always be my favorite past time, it is so relaxing to sit down and color.  These days I color with Copic Markers and this project I picked one of Sherri Baldy's My Besties images and just colored and colored and colored until I had the correct look for this Sailor Mermaid


Using plain paper to practice and then ultimately making the finished project, I can truly say I am happy with the results.  Her tail was created with the ever popular dot technique and Shaved Ice from Stampendous


When I had her all done, I was going to put her on a card, but because I had already enlarged her I felt it fitting to make her into a page layout so that when I teach Copic Classes I would be able to have this on display


I want to thank you for stopping Glittered Roses where "creating handmade" is god for the soul

xoxo Deirdre

Here is a video that talks in detail about this layout:


Related Posts Plugin for WordPress, Blogger...